The bus provides the power for the aircraft charging system through the alternator switch.
The field and alternator circuit breakers protect against a short circuit in the charging system.
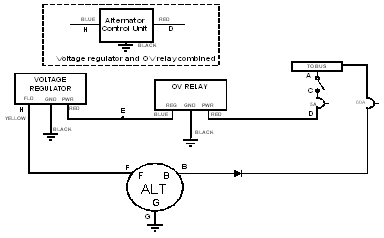
In this “type B” system the over voltage relay (OVR) provides power to the voltage regulator.
If the system voltage exceeds the over voltage trip point the relay will open, removing power
from the regulator.
The voltage regulator (VR) controls the excitation of the alternator field to keep the aircraft
electrical system voltage at a specific level. An alternator control unit (ACU) combines the voltage
regulator with other functions, such as over voltage protection. A “Type B” regulator excites the
field of the alternator by providing controlled power to one side of the alternator field. The other
side of the alternator field must be grounded.
The aircraft charging system uses the alternator to convert the mechanical energy produced by the
engine to electricity used in charging the battery and running other electrical systems in the aircraft.
As long as the field circuit of the alternator is fully excited the alternator’s output will continue
to increase until it reaches its maximum.
Troubleshooting
Whenever there is an electrical charging system problem, it is tempting to begin replacing components
until the problem goes away. While this method usually works, it can overlook the cause of the component
failure. It is important that a systematic approach be used in locating and solving the problem.
Charging system problems associated with the voltage regulator and alternator should be analyzed in
this manner:
- PRE-VOLTAGE REGULATOR CHECKS
- VOLTAGE REGULATOR CHECKS
- POST VOLTAGE REGULATOR CHECKS.
This is the concept behind the unique design of ZEFTRONICS' self-testing, self-protected,
field fault/function indicating voltage regulators (Alternator Controllers) like the R1510L,
R15V0L, R25400 and others. These units can alert the mechanic to problems before, at, and
after the voltage regulator.
Refer to the labeled test points on the system diagram below.
PRE-VOLTAGE REGULATOR
Check the alternator switch (A-C), field circuit breaker (C-D), wires and terminals, and
the OV relay (D-E) for contact resistance build-up: resistance should be less than 0.1 ohms.
|
|
AT VOLTAGE REGULATOR
Check that there is power coming into and going out of the voltage regulator. In this type B system:
Without the engine running, with Master switch ON, measure battery voltage (Vbatt) at (E) and
approximately 1.0V less than Vbatt at (H). If the two voltages are the same the VR is shorted or
alternator field/wire is open. If the VR output is 0 volt, the VR is defective (unless it is
self-protected and has turned itself off due to field over-current or grounded field).
POST VOLTAGE REGULATOR:
- Check your alternator by measuring the resistance of the field. Resistance from
Fld to Gnd on the alternator should be from 3.5 to 5.0 ohms. Check the resistance
of the meter leads before measuring field.
- Check for a “flying” short and other intermittent problems by slowly rotating the
alternator while measuring the field resistance. A drop below 3.0 ohms could indicate
a bad alternator that might damage the voltage regulator.
- Check the condition of the alternator's field, pulley, gear/belt, terminals,
and wires connecting it to the VR and the aircraft charging system.
- Check the battery relay for proper operation and connections.
- Check the fluid levels and charging capacity of the battery.
Notes
- Pay attention to the DIFFERENCES between measured voltages. For example, if
12.7 volts if measured on the input of a switch and 12.0 volts is measured on the
output, the difference of 0.7 volts is excessive and the switch is bad.
- Make sure that terminals, connections, and contacts are not corroded or oxidized.
- After a problem is found, continue checking the rest of the system. A problem with
one section of the charging system can be caused by a subtler malfunction of another section.
Example: A shorted voltage regulator can be caused by an intermittent short or arcing
in the alternator. Or, a bad ground connection can cause nuisance tripping of
the OV relay.
After troubleshooting the system, finding and resolving any faults, run the engine
at 1500 RPM. The bus voltage should be 13.8 – 14.3 volts. If a fault occurs, shut
down the engine but do not turn off the master switch. Measure the system voltages at
the points shown on the system diagram.
Zeftronics is available to help in troubleshooting any aircraft charging system problem.
You can contact us at 903-758-6661 or ECSS@zeftronics.com.
(Free of charge) Or meet us at Gregg County Airport (GGG), Longview, Texas. (By appointment only,
hourly charges will apply)
|
|